The concept
Back in March 2021 when I joined Quake for Newbies some people were amused by my markDemo chatbind, the purpose of which I will tell you about here. There is a neat piece of software called UDT that allows you to cut QL and Q3 demos into little snippets. It has a feature where if it detects a specified chat message, it can automatically cut a demo from that bit of the game.
The idea is that you have a chatbind with some unique words that the software can recognize. Whenever something cool happens, you press your chatbind key, everyone will see that you have considered the frag or whatever happened interesting.
Creating a chat bind
My chatbind goes something like bind MOUSE5 say "burt, please mArKdEmO", but it would be no good if you would just copy that. You come up with your own chat message, like olmos Marker den frækkert. Then you do a bind like bind x say "message". Everytime you press x now there will be a message in the chat. Just make sure you’re recording a demo and mark your stuff then you’re set for the next step.
Setting up UDT
First, you’ll need to get UberDemoTools. It can be obtained from the official website. You might soon notice this error message that pops up when opening the application.

Update error
To fix it, just go to the Settings and disable the option “Start-up Updates”. Now for the actual demo cutting. First you will go to “Patterns” > “Chat” and create a new chat rule. You can change the parameters but sticking with the preset ones is fine.
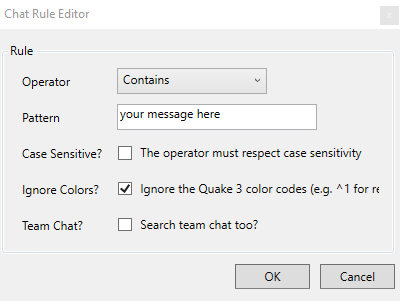
Creating a chat rule
After your pattern is created, you can import some demos into UDT. Of course, you’re not restricted to only use the chat patterns, there are a bunch of other patterns as well that you can mess about with, I just personally am not using those, so feel free to let others know your findings.
Make sure you’re in the “Patterns” > “Chat”or in “Pattern Search” menu. Either drag-and-drop into the sidebar demo list, or use the file option up top to import some.
Cutting the demos
The next step is cutting (or searching). When you click the Cut! button, there will be a window where you can select the offset before and after the mark. You can tweak those for individual frags if it is too short. Default is 10/10, but doing some longer shouldn’t do any harm. After that, UDT will do its thing and put all the cut demos next to the demo they were created from. So if you had a demo foo.dm_91 in a folder, there will be some demos named foo_CUT_CHAT_blah.dm_91 in the folder now.
You can rename those with some scripts if that is your kind of thing, or use an application like Bulk Rename Utility, or alternatively Microsoft Power Toys.
What to do afterwards
When you eventually have all your demos cut, it is time to jump into the game and check them all. Watch each snippet and decide what to keep and what not to. Over time, you can amass a collection of cool frags.
You can use those demos like any other normal demo files, for example, you can render them in Wolfcam, or send them to other people that like to do movies. Or, for Quake 3 demos, you could use my demo rendering script, which might get an article written for it in the future.